Creating a Thrilling Monster Truck Game with Box2DCreateJS
Written on
Introduction to Monster Truck Game Development
Welcome! This article will guide you through the steps of developing a monster truck game using Box2DCreateJS. If you're new to Box2DCreateJS, make sure to check out additional resources to familiarize yourself.
In this game, you will control a monster truck and navigate it over ramps for jumps and tricks, utilizing keyboard controls. By the end, you will have a fully functioning game!

Setting Up the Project
Before diving into the coding, let’s prepare our project. Follow the instructions in this guide for initial setup.
Download Game Assets
For this game, we’ll need three images:
Download these images and place them in the project's image directory.
Importing Box2DCreateJS Libraries
Next, include the Box2DCreateJS library files in your index.html:
<!DOCTYPE html>
<html lang="en">
<head>
...
<script src="box2dcreatejs/js/Box2dWeb/Box2dWeb-2.1.a.3.js"></script>
<script src="box2dcreatejs/js/CreateJS/easeljs-1.0.0.min.js"></script>
<script src="box2dcreatejs/js/CreateJS/preloadjs-1.0.0.min.js"></script>
<script src="box2dcreatejs/js/Box2DCreateJS/WorldManager.js"></script>
<script src="box2dcreatejs/js/Box2DCreateJS/Entity.js"></script>
<script src="box2dcreatejs/js/Box2DCreateJS/Render.js"></script>
<script src="box2dcreatejs/js/Box2DCreateJS/LoadingIndicator.js"></script>
<script src="box2dcreatejs/js/Box2DCreateJS/Link.js"></script>
<script src="MyGame.js"></script>
...
</head>
...
</html>
Initializing the WorldManager
In MyGame.js, define a variable _worldManager and instantiate it within the initialize function. The preLoad property will be used to load images before the game starts. Once the preloading is complete, the gameLogic function will be called.
this.Box2DCreateJS = this.Box2DCreateJS || {};
(function () {
function MyGame() {
this.initialize();}
Box2DCreateJS.MyGame = MyGame;
let _worldManager;
MyGame.prototype.initialize = function () {
const easeljsCanvas = document.getElementById("easeljsCanvas");
const box2dCanvas = document.getElementById("box2dCanvas");
_worldManager = new Box2DCreateJS.WorldManager(
easeljsCanvas, box2dCanvas, {
world: new box2d.b2World(new box2d.b2Vec2(0, 10), true),
enableDebug: true,
preLoad: {
files: [
'images/monster-chassis.png',
'images/monster-tire.png',
'images/background.jpg',
],
onComplete: gameLogic
}
}
);
}
function gameLogic() {
}
}());
Building the Game Environment
Next, we will create the ground and set boundaries for the game area by implementing the createFloorAndLimits function in MyGame.js and invoking it from gameLogic.
function gameLogic() {
createFloorAndLimits();
}
function createFloorAndLimits() {
const staticRender = {
type: 'draw',
drawOpts: {
bgColorStyle: 'solid',
bgSolidColorOpts: { color: 'black' }
}
};
// Create the floor
_worldManager.createEntity({
type: 'static',
x: 5000, y: 490,
shape: 'box',
boxOpts: { width: 10000, height: 20 },
render: staticRender
});
// Create walls
_worldManager.createEntity({
type: 'static',
x: 0, y: 0,
shape: 'box',
boxOpts: { width: 10, height: 1000 },
render: staticRender
});
_worldManager.createEntity({
type: 'static',
x: 10000, y: 0,
shape: 'box',
boxOpts: { width: 10, height: 1000 },
render: staticRender
});
}
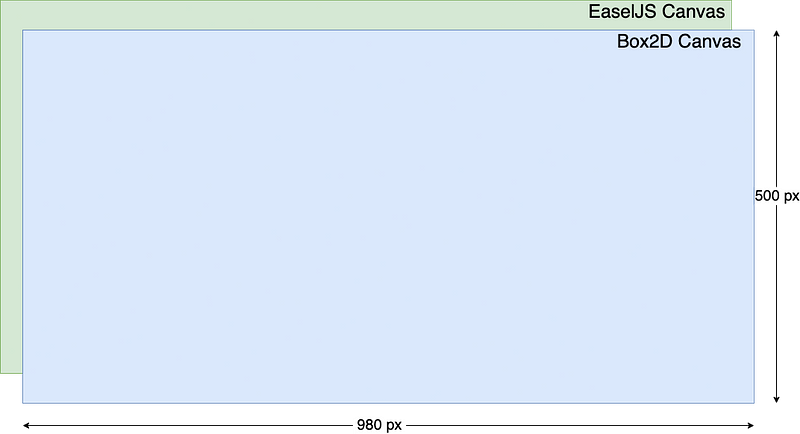
The dimensions of both the EaselJS and Box2D canvases are 980 pixels in width and 500 pixels in height.

Enhancing the Background
To make our game visually appealing, let's import a background image. This requires adding the Landscape.js file to index.html.
<!DOCTYPE html>
<html lang="en">
<head>
...
<script src="box2dcreatejs/js/Box2DCreateJS/Landscape.js"></script>
...
</head>
...
</html>
Then, we will define the createLandscape function and call it from the gameLogic.
function gameLogic() {
createFloorAndLimits();
createLandscape();
}
function createLandscape() {
_worldManager.createLandscape({
x: 5000, y: 230,
shape: 'box',
boxOpts: { width: 10000, height: 500 },
render: {
opacity: 0.7,
type: 'draw',
drawOpts: {
bgColorStyle: 'transparent',
bgImage: 'images/background.jpg',
repeatBgImage: 'repeat-x'
}
}
});
}
Creating the Monster Truck
Now, let's create the monster truck by implementing the createMonsterTruck function in MyGame.js and calling it from gameLogic.
function gameLogic() {
createFloorAndLimits();
createLandscape();
const monsterTruck = createMonsterTruck();
}
function createMonsterTruck() {
const TRUCK_X = 360, TRUCK_Y = 250;
const chassis = _worldManager.createEntity({
type: 'dynamic',
x: TRUCK_X, y: TRUCK_Y,
shape: 'box',
boxOpts: { width: 150, height: 50 },
render: {
type: 'image',
imageOpts: {
image: 'images/monster-chassis.png',
adjustImageSize: true
}
},
name: 'chassis'
});
const tireRender = {
type: 'image',
imageOpts: {
image: 'images/monster-tire.png',
adjustImageSize: true
}
};
const backTire = _worldManager.createEntity({
type: 'dynamic',
x: TRUCK_X - 45, y: TRUCK_Y + 45,
shape: 'circle',
circleOpts: { radius: 30 },
render: tireRender,
bodyDefOpts: { angularVelocity: 70 },
fixtureDefOpts: { restitution: 0.2 }
});
const frontTire = _worldManager.createEntity({
type: 'dynamic',
x: TRUCK_X + 50, y: TRUCK_Y + 45,
shape: 'circle',
circleOpts: { radius: 30 },
render: tireRender,
bodyDefOpts: { angularVelocity: 70 },
fixtureDefOpts: { restitution: 0.2 }
});
_worldManager.createLink({
entityA: chassis,
entityB: backTire,
type: 'revolute',
localAnchorA: { x: -1.6, y: 1.6 }
});
_worldManager.createLink({
entityA: chassis,
entityB: frontTire,
type: 'revolute',
localAnchorA: { x: 1.6, y: 1.6 },
});
return { chassis, backTire, frontTire };
}
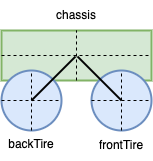
The monster truck consists of three dynamic components: the chassis (box-shaped) and the front and back tires (circular).

Implementing Player Controls
Next, we will add player control functionality by incorporating Player.js and Camera.js files into our project.
<!DOCTYPE html>
<html lang="en">
<head>
...
<script src="box2dcreatejs/js/Box2DCreateJS/Player.js"></script>
<script src="box2dcreatejs/js/Box2DCreateJS/Camera.js"></script>
...
</head>
...
</html>
In MyGame.js, we instantiate the player and define control events for movement and rotation.
function gameLogic() {
createFloorAndLimits();
createLandscape();
const monsterTruck = createMonsterTruck();
const chassis = monsterTruck.chassis;
const frontTire = monsterTruck.frontTire;
const player = _worldManager.createPlayer(chassis, {
camera: {
adjustX: 490,
xAxisOn: true
},
events: {
backward: () => frontTire.getB2Body().SetAngularVelocity(-70),
forward: () => frontTire.getB2Body().SetAngularVelocity(70),
anticlockwise: () => chassis.getB2Body().SetAngularVelocity(-1),
clockwise: () => chassis.getB2Body().SetAngularVelocity(1)
}
});
}
Adding Keyboard Controls
To facilitate player controls, include the KeyboardHandler.js file in index.html.
<!DOCTYPE html>
<html lang="en">
<head>
...
<script src="box2dcreatejs/js/Box2DCreateJS/KeyboardHandler.js"></script>
...
</head>
...
</html>
In MyGame.js, use the _worldManager to create a keyboard handler mapping the arrow keys to player actions.
function gameLogic() {
...
const player = _worldManager.createPlayer(chassis, {
...});
_worldManager.createKeyboardHandler({
keys: {
ArrowDown: {
onkeydown: () => _worldManager.getPlayer().backward(),
keepPressed: true
},
ArrowUp: {
onkeydown: () => _worldManager.getPlayer().forward(),
keepPressed: true
},
ArrowLeft: {
onkeydown: () => _worldManager.getPlayer().anticlockwise(),
keepPressed: true
},
ArrowRight: {
onkeydown: () => _worldManager.getPlayer().clockwise(),
keepPressed: true
}
}
});
}
Adding a Ramp for Excitement
To increase the thrill of the game, let's create a ramp by implementing the createRamp function.
function gameLogic() {
...
createRamp();
}
function createRamp() {
const staticRender = {
type: 'draw',
drawOpts: {
bgColorStyle: 'solid',
bgSolidColorOpts: { color: 'black' }
}
};
// Create two ramps
_worldManager.createEntity({
type: 'static',
x: 4000, y: 450, angle: 75,
shape: 'box',
boxOpts: { width: 10, height: 400 },
render: staticRender
});
_worldManager.createEntity({
type: 'static',
x: 4390, y: 450, angle: -75,
shape: 'box',
boxOpts: { width: 10, height: 400 },
render: staticRender
});
}
Final Steps: Disabling Debug Mode
Now that the game is complete, we can turn off the debug mode by setting enableDebug to false in MyGame.js.
this.Box2DCreateJS = this.Box2DCreateJS || {};
(function () {
...
MyGame.prototype.initialize = function () {
...
_worldManager = new Box2DCreateJS.WorldManager(
easeljsCanvas, box2dCanvas, {
world: new box2d.b2World(new box2d.b2Vec2(0, 10), true),
enableDebug: false,
...
}
);
}
...
}());
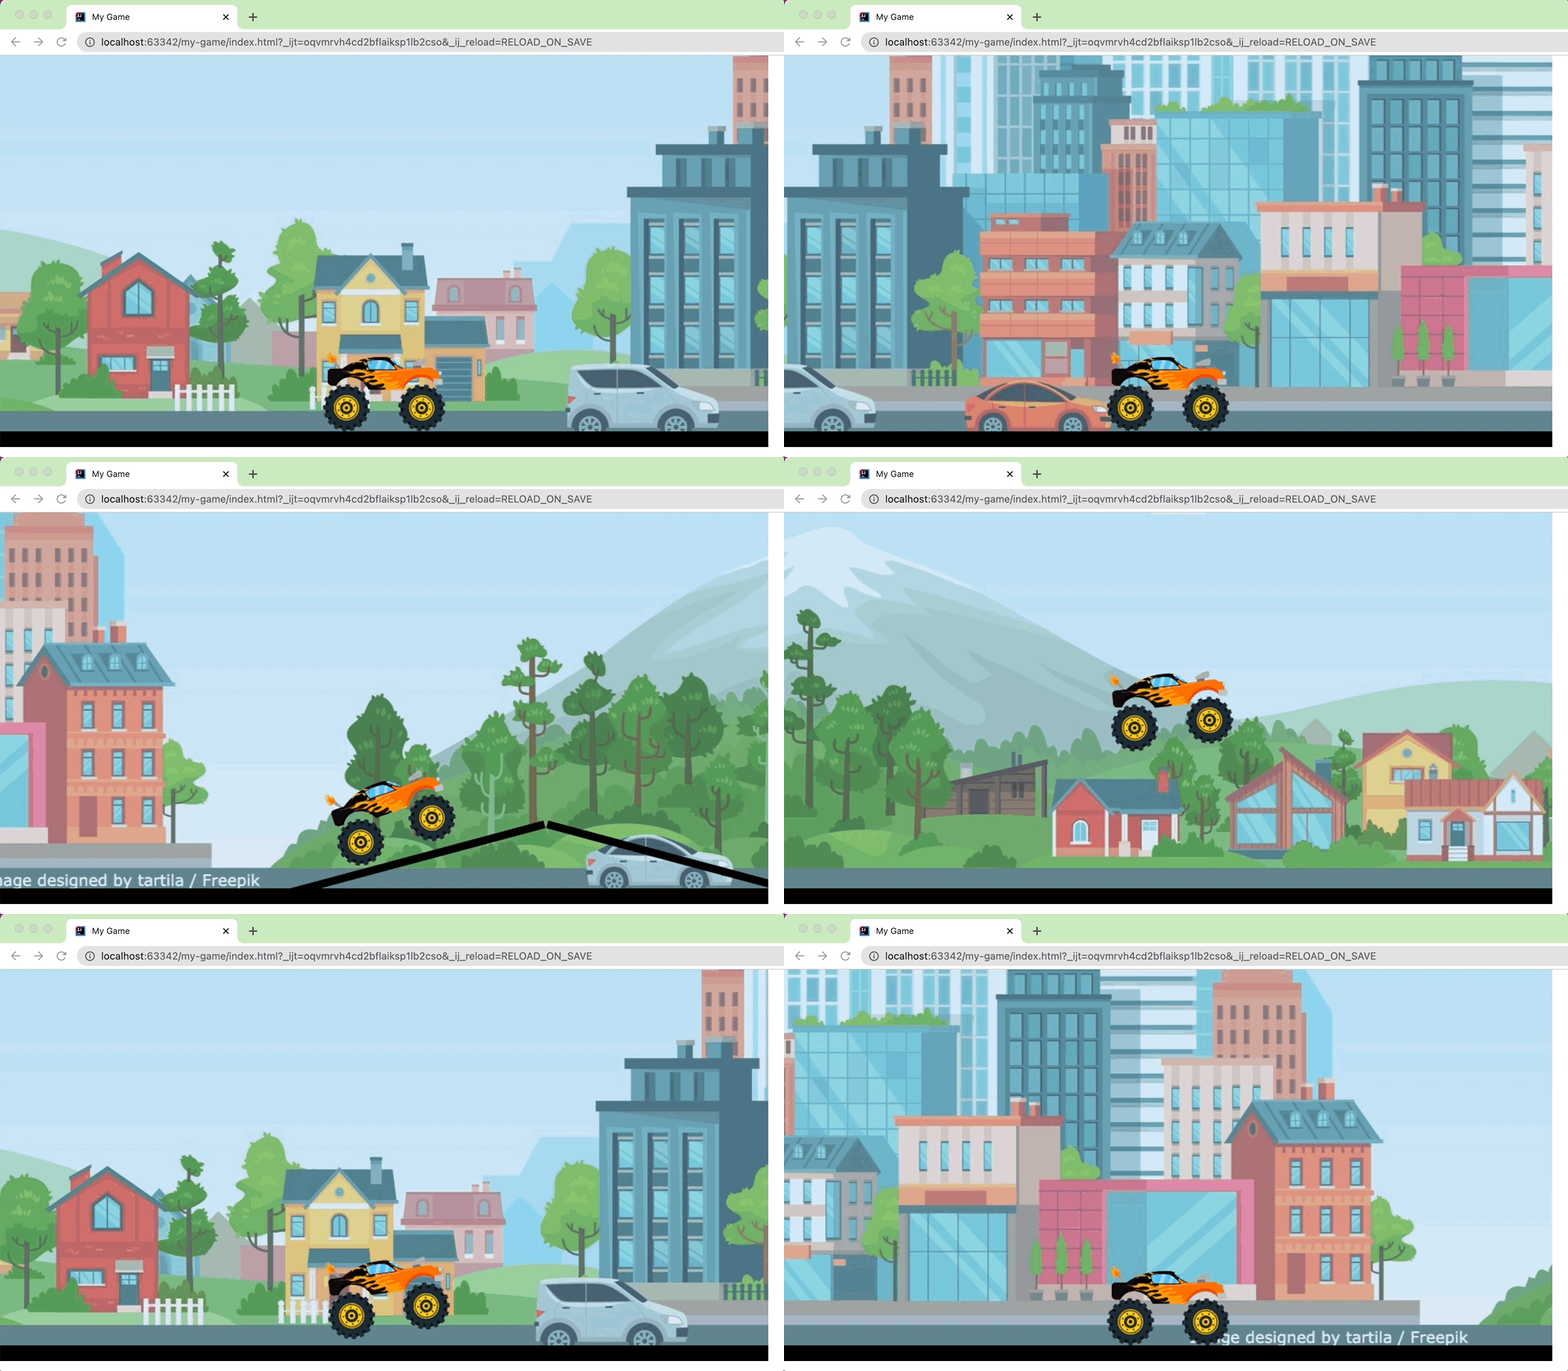
It's time to enjoy your game!

Additional Resources
You can find the source code at the Box2DCreateJS GitHub Repository. Here are some other tutorials you might find helpful:
- Box2DCreateJS: Merging Box2D with CreateJS for a Unified Library
- Box2DCreateJS: Setting Up the Initial Project
- Box2DCreateJS: Creating and Interacting with a Ball Using the Cursor
Support and Engagement
If you found this article helpful, please consider supporting by:
- Engaging through comments and shares on social media.
- Following me on: Medium | LinkedIn | Twitter.
- Subscribing to my newsletter for more updates.