Creating a Backlit Lithophane Housing in Fusion 360
Written on
Introduction to Backlit Lithophanes
Following my previous article on crafting a Lithophane using 3D printing, I will now guide you through designing a casing that serves as a backlight for your creation. This project is beginner-friendly, requiring no soldering skills.
To embark on this project, you will need the following materials:
After creating your Lithophane, it’s always captivating to illuminate it and witness the transformation. However, it often ends up placed on a shelf, rarely held up to the light. To enhance visibility and appreciation, I decided to design a discreet backlight that complements the Lithophane rather than overwhelming it.
Video: Fusion 360 Create Box for Lithophane
This video demonstrates how to create a box design specifically tailored for Lithophanes, showcasing the step-by-step process in Fusion 360.
Designing the Housing
The housing design incorporates a curved outer Lithophane. Once you have selected and printed your image, it's crucial to measure the dimensions accurately so that it fits perfectly into the designated holder. For instance, the image I used measured 167 mm in width and 116 mm in height, allowing for a seamless print of the housing.
Ensuring Compatibility
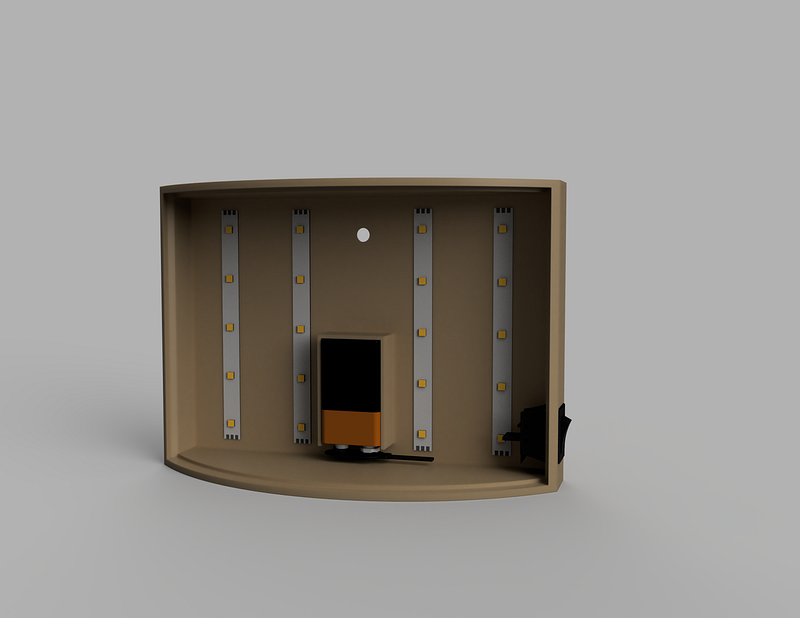
While designing, I ensured that all electronic components fit harmoniously without interfering with one another. This was particularly important for the battery; if positioned incorrectly, it could obstruct the light and create shadowy areas within the housing. To guarantee an even projection of light onto the Lithophane, I spaced the LED strips uniformly.
I also created a slot for the on/off switch, allowing it to be securely inserted without glue.
Electronics Setup
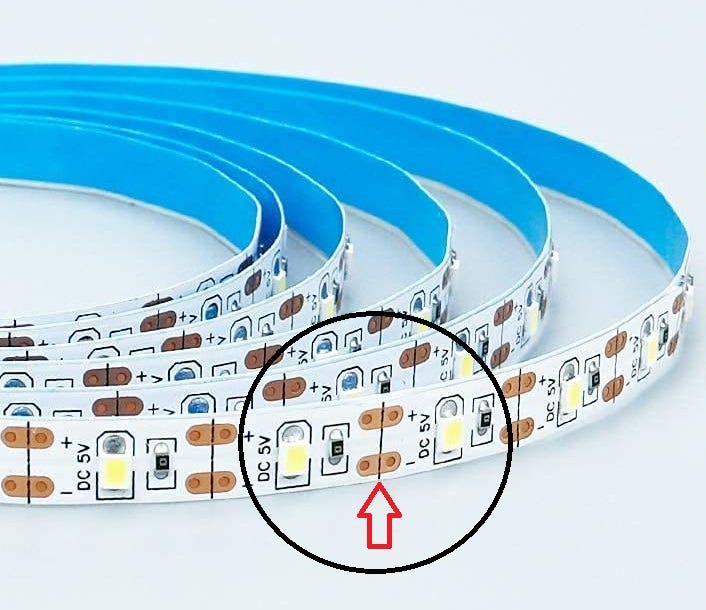
The electronic setup for this project is quite straightforward. LED strips are designed for individual operation of each LED, enabling precise cutting to acquire four equal-length strips. When cutting, be sure to slice between the contacts for optimal reconnection.
Once the LED strips are cut, position them adjacent to one another and reconnect them using cables—negative to negative and positive to positive. The negative end connects to the battery, while the positive runs through the on/off switch back to the battery.
Final Touches
After integrating the electronics into the housing, you can insert the Lithophane. When you activate the switch, the Lithophane will shine brilliantly, making it an excellent decoration or gift.
I hope this tutorial has been enjoyable and inspires you to create your own illuminated housing for Lithophanes. For further insights into Lithophanes, check out my article, “How to Create a Colorful Lithophane.”
If you have any questions or need assistance, please don’t hesitate to reach out.
Note: This article includes affiliate links.
Video: How to Design a Lithophane. Part 1 of 3
In this instructional video, viewers will learn the foundational steps for designing a Lithophane, focusing on techniques and tips to ensure successful results.